
These easy (and quick!) braided headbands are perfect for summer!
Great for girls and adults :)

 Use them to hold back bangs or spice up a simple do
 They are so fun and simple that you will be making them by the dozens in no time
Supplies:
Scrap fabric
Elastic (I used 1/2 width)
Sewing Machine
 Step 1:
Cut 3 strips of fabric 20 inches long and 1 piece of elastic 4 inches long.
 Step 2:
Place the three fabric strips ontop of each other and place the piece of elastic in between the layers (you can pin in place but I just held it in place with my finger).
 Step 3:
Sew the fabric strips (with piece of elastic inside) together to secure. I suggest going over the elastic part a few times to make sure it won't come loose.
 Step 4:
Braid the fabric strips together until you reach the end
 Step 5:
 Step 5:
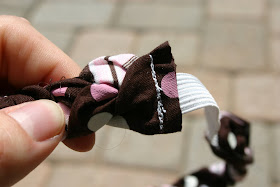
Grab the loose end of the elastic and tuck into the end of the briaded strips (between two of the layers) making sure the braid is not twisted.
 Step 6:
 Step 6:
Sew to secure (again I just held it in place).
 Step 7:
 Step 7:
Trim the extra fabric from the side you just sew so it looks nice and pretty.
 See, nice and pretty.
 Step 8:
 See, nice and pretty.
  Step 8:
Go back to the other side of the headband where you started the braid from. See how it looks, well, not so nice and pretty?
 Wrap the extra fabric around the sides of the headband to the back and sew to secure.
 Much better!
 Yeah! You're you done! Now wasn't that easy!
 Try it on and admire your work!
 Wrap the extra fabric around the sides of the headband to the back and sew to secure.
 Much better!
 Yeah! You're you done! Now wasn't that easy!
 Try it on and admire your work!
That's cute! My oldest is getting to where she doesn't want hair bows, so maybe this would be a compromise. ;)
ReplyDeleteHow cute. I think i am going to try this for their 4th of July outfits.
ReplyDeleteThat's very cute! And I'm sure little girls would love to be involved in the braiding process!
ReplyDeleteI love it. Can't wait to make one for myself.
ReplyDeletecute idea.. i cant wait to try this! :)
ReplyDeleteI saw this on Ucreate today and just had to make them myself. I made them to match my daughters new pj's I made them out of the left over fabric soooooo cute.
ReplyDeletehttp://mommieof4munchkins.blogspot.com/2009/07/cutest-little-headbands.html
I made a couple tonight. Turned out cute. One question.. when braiding the fabric..are you suppose to fold each piece in half vertically so you don't have the underside of the fabric showing..or does it really matter?
ReplyDeletecheck out photos here..
http://www.flickr.com/photos/pfu/
This is so cool!!! i posted a link to your tutorial on Craft Gossip Sewing: http://sewing.craftgossip.com/tutorial-braided-fabric-headband/2009/07/03/
ReplyDelete--Anne
Great idea! My girls always seem to have hair in their eyes/mouths/faces so these will be great for them.
ReplyDeleteYay!!! My best friends b'day is in 1 week, u just saved me! She has super straight long hair, this will be a great little gift in her fave colours!!! Thanku.
ReplyDeleteHi Heather,
ReplyDeleteI checked out the ones you made. So cute! To answer your question...I didn't fold the fabric over. I just did my best to keep the "right" side of the fabric showing but if you wanted a more clean look you could definitely do that. Just depends what look you are going for. I kind of liked the messy look :)
adorable! definitely making some for my girls...and myself :)
ReplyDeleteI can't wait to make a few for my daughters. I have one question before I start though- what is the width of the strips? 20"x?"
ReplyDeleteThank you,
Shari
Hi I just found your blog. Love the braided headband!! Can't wait to look around and see what else you have on here!
ReplyDeleteLOVe these, as soon as my baby gets hair!!
ReplyDeleteLove these. I'm adding it to my list of projects to do at http://helpinglittlehands.blogspot.com/
ReplyDeleteOk, you lied it took me 6 minutes to make! ;-) I used some left over jelly roll strips in my favorite colors-pink & chocolate brown. Will post on my blog later and link back. Thanks so much for sharing!!
ReplyDeleteI just LOVE LOVE LOVE your blog! Another great tutorial! THANKS! :)
ReplyDeleteJust wanted to say thank you for a great tutorial! I'm posting a link on my blog to it, hope that's ok!
ReplyDeleteqzz0615
ReplyDeletebarbour jackets
coach outlet online
hornets jerseys
coach outlet online
true religion uk
minnetonka outlet
polo outlet
ugg outlet
tag heuer watches
michael kors outlet